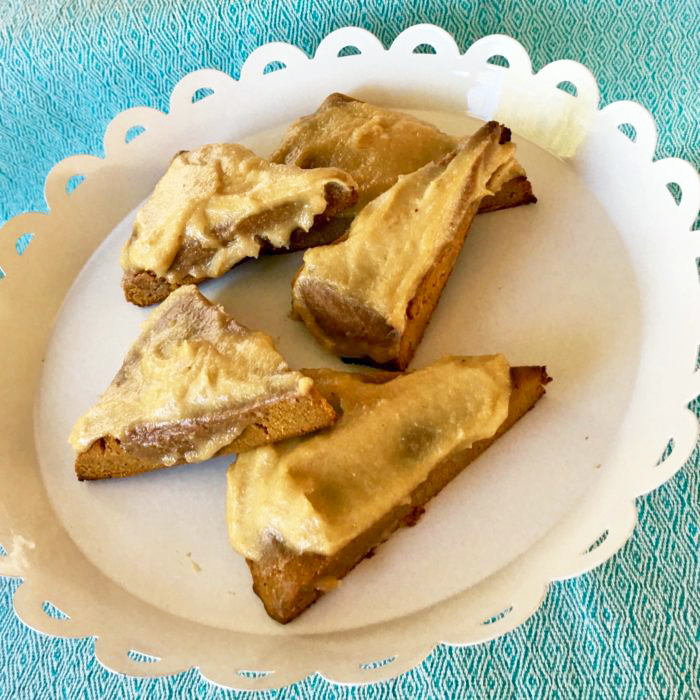
Looking for a guilt-free fall time favorite treat? Look no further! These gluten-free, vegan pumpkin scones will leave you drooling for more all throughout the holidays. Inspired by Starbucks' infamous seasonal scones, this simple and healthy recipe for pumpkin scones is guilt-free, grain-free, refined sugar-free, paleo-friendly, and DELICIOUS!

- SCONES
- 1 1/4 cups organic pumpkin puree (room temperature)
- 1/2 cup coconut oil
- 1/4 cup coconut manna (coconut butter)
- 3/4 cup maple syrup
- 1/4 cup hot water
- 1 tablespoon pure vanilla extract
- dash of salt
- 1 teaspoon cinnamon
- 1/2 teaspoon cloves
- 1/4 teaspoon allspice
- 1/8 teaspoon nutmeg
- 1 1/2 cups coconut flour
- 1 cup tapioca starch
- GLAZE
- 1 cup soaked cashews (anywhere from 2 hours- overnight)
- 1/3 cup maple syrup
- 2 tablespoons coconut oil
- 1 tablespoon non-dairy milk (I like unsweetened vanilla almond milk)

Directions
1. Combine coconut oil and coconut butter in an oven safe glass container and place in the microwave for a few minutes. Just enough to warm up the oil and butter and have them melt together.
(If your maple syrup and pumpkin puree are cold, please include them in the glass container and heat with the oils. This will keep the coconut oil from solidifying if it comes in contact with any cold ingredients.)
2. Pour the coconut oil, coconut butter, pumpkin puree, maple syrup, hot water, vanilla, and spices into a large mixing bowl and blend all the ingredients together using a hand blender. Mix until consistency is smooth. Note: mixing by hand or a food processor is also a suitable option.
3. Cut and set aside a large piece of parchment paper, roughly the same size as a cookie sheet.
4. Add the coconut flour and tapioca starch to the liquid mixture (step 2's mixture) in the mixing bowl and mix together using a wooden spoon. Continue stirring until all dry ingredients are mixed in.
You may notice the batter will need more mixing than your wooden spoon can handle, don't worry that is normal!! At this point, you will use your hands to thoroughly knead the dough.
5. Shape the dough into a large ball and place the dough ball onto the parchment paper.
6. Transfer both the parchment paper and dough ball onto a cutting board.
7. Flatten the dough ball with your hands into a 1″ tall disc. Smooth and round off all the edges with your hands so the disc is evenly rounded and the same thickness throughout. Using a knife, cut the disc into 8 triangles.
8. Do not separate the scones just yet!!! Place the entire cutting board into the fridge and refrigerate for at least 20 minutes.
9. Preheat oven to 350F while your scones are chilling in the fridge. After the 20 minutes, remove from the fridge and transfer the parchment paper along with the scones onto a cookie sheet. Gently separate the scones apart on the cookie sheet on top of the parchment paper.
10. Bake scones for approximately 22-26 minutes (watch the edges and remove from oven when they begin to brown).
11. Carefully remove scones from the cookie sheet and place on a cooling tray for 10 minutes.
12. While cooling, you can prepare the glaze. Placing all glaze ingredients (soaked cashews, coconut oil, maple syrup and non-dairy milk) in your blender and blend on high until smooth. I used my Nutribullet for this; however, a regular high power blender will work too. My Nutribullet needed a little help, so feel free to add a little more non dairy milk if the consistency is too chunky.
13. Once the scones have cooled, use a spoon to generously spread the glaze over each scone.
14. Serve warm with a hot cup of coffee...YUM! Or try them chilled for a quick, healthy breakfast on the go!
Also by Kayla: Vegan & Gluten-Free Zucchini Patties (Autoimmune Protocol Friendly!)
Related: Gluten-Free Vegan Pumpkin Pie Bites
Gluten-Free & Vegan Blueberry Scones
Get more like this—Subscribe to our daily inspirational newsletter for exclusive content!
__
Photos: Kayla Adams