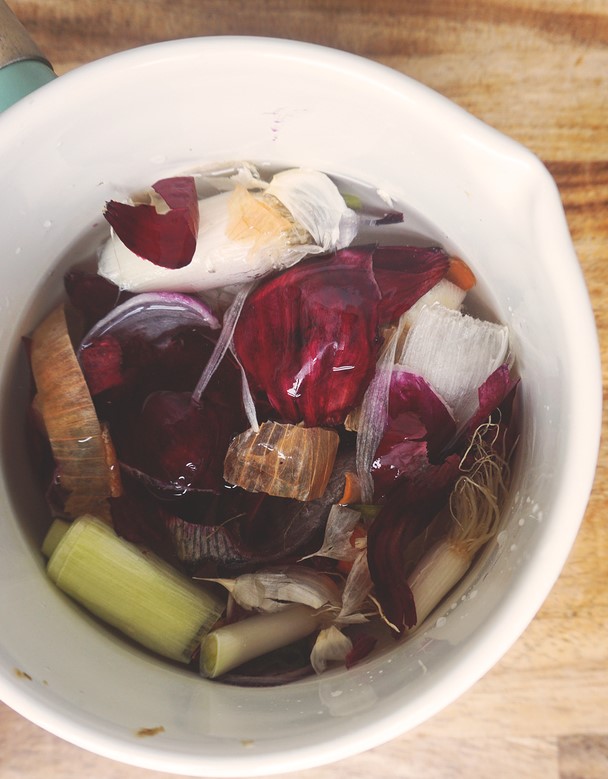
I literally keep everything that I would toss in the compost (except moldy or mushy parts that aren't edible anymore). The scraps I collect are mainly onion peels, carrot peels, spring onion, leek tops and bottoms, garlic peels, potato skin, celery, zucchini or eggplant tops and bottoms, mushroom stems, cabbage core and trim. I often add the bits I cut off from my herbs, tomato and peppers as well. sometimes even corn cobs!
Some folks recommend avoiding brassica trimmings (e.g. broccoli or cauliflower) to make veggie broth from kitchen scraps, as it may make the broth more bitter-tasting. However, I almost always include broccoli stems in mine and never had problem with it, but also I don't keep my scraps in the freezer as long as others might.


- kitchen scraps
- to taste salt, pepper
- to taste Italian seasoning if you don't have herb scraps
- 1–2 bay leaves
- optional fresh onions, carrots, garlic, etc

Directions
1. The first step is to collect scraps. Store the saved goodies in a sealed freezer bag, or other closed container in the freezer (my mom uses jars).
2. When my bag is full, I take out its contents and transfer them in a pot. Start by sautéing any fresh ingredients you may be using (e.g. extra onion, garlic, carrots, or herbs) with a splash of olive oil and a pinch of salt and pepper. Add in bay leaves.
3. Cover all of it in just enough water and bring to a boil, then reduce to a simmer for about 40–60 minutes. Using too much water will result in a weak-flavored, watery broth. The longer you leave it boiling the stronger the flavor is going to be.
4. If you haven’t added any salt yet, do so now. Start by a pinch or so, and then taste your broth later once it’s nearly ready to be strained. Adjust salt and pepper to taste then if needed.
5. Once the broth has boiled to the desired flavor, take it off the stove and carefully run your broth through the strainer. I also like to use a wooden spoon to press down on the veggies in the strainer, extracting as much liquid as possible.
6. The veggies themselves can be composted after this by the way. The broth itself should be stored in a clean jar and can stay fresh in the fridge for about a week. You can also make some ice cubes with it and store it in the freezer for months.
More zero-waste recipes: Vegan Carrot Top Pesto
Get more like this—Sign up for our daily inspirational newsletter for exclusive content!
__
Photo: Imola Toth