The thing about Pinterest is that if you comb through it long enough, you’ll start to develop a sense of confidence you don’t rightly deserve. After spending a weekend pinning a ridiculous amount of “easy DIY projects,” I got it into my head that I could transform my shabby ‘70s ranch house into a “straight out of a magazine” home without exhausting too much energy or money.
Boy, was I wrong.
I was an hour into my first project when I realized I was way out my element. This wasn’t a discussion on “Game of Thrones” fan theories, or the positive impact “Sailor Moon” had on a generation of girls — this was hammer, nails, blood, sweat, and tears style labor. Fortunately, I had a cadre of experienced helpers on hand and a vast reserve of patience (which I’m pretty sure I’ve used up now). Here’s what I learned:
Are we done yet?
Paint Is a Tricky Mistress
Paint is easily one of the cheapest improvements you can make to a home that will increase its value. Paint also happens to be the only thing I went into this renovation knowing how to do — or, at least, I thought I did. As it turned out to be with the whole project, I was too cocky and ended up eating a generous helping of humble pie.
I wanted to transform the walls of my home from a too dark brown in some rooms, and a boring white in others, to a lovely light shade of blue-grey. Seems simple enough, right? I had Primer+Paint, brushes, rollers, extenders, edgers, trays, tape, drop cloths — the whole nine yards. And in truth, everything went smoothly … until I had the rooms completely painted.
You see, that’s when I realized that the “white” ceiling and trim in my house was actually more of an ivory — and ivory looked yellow next to blue-grey. I had swatched the grey next to the floors and hearth, but not next to the ceilings and trim. I ended up having to drop a whole lot more money on white paint to cover the ivory, and the energy expended while painting the ceilings damn near killed me. It was highly unpleasant, to say the least.
What you can learn from my mistake: Always, always, always swatch your paint next to everything it will touch (e.g. floors, ceilings, trim, furniture). You don’t want to end up spending a fortune on paint — and trust me when I say that you don’t want to paint ceilings multiple times.
Even the Most Mundane Projects Are Bound to Be Troublesome
After the paint debacle was over, I was ready to take on some easy, no-nonsense tasks. What I should have realized by this point was that, when it comes to renovation, nothing is “no-nonsense.”
Most rooms in my house still had the original electrical outlets/covers from the ‘70s, and the plastic on them had yellowed over time. Since they were flush against my pretty new paint, I wanted to switch them out with some crisp white outlets instead. I did a little Google search on how to change old outlets and felt confident that I could complete the task quickly and easily.
I wasn’t counting on backstabbed wiring.
Instead of having the proper screw terminals on the side, they had holes in the backside where the wires were “stabbed” into the outlet. This was not only incredibly difficult to replace (those wires did not want to let go), it also turns out that it was a major fire hazard. One outlet even broke into pieces in my hand as I attempted to remove the wires from the back. It was incredibly disconcerting to realize that the wiring in my house may be dangerous and in dire need of replacement.
The outlets weren’t the only “simple” project that was more complicated than expected. Replacing the wired doorbell with a wireless one took two days because we couldn’t find the terminal. Putting the freshly painted interior doors back on the hinges took hours, because some of the hinge pins were larger than others and had been mixed up during the commotion. Putting the trim on cupboard doors took an entire day because we kept buying the wrong screws.
Long story short, there are always complications.
What you can learn from my mistake: Go into each project expecting obstacles. This puts you in a good head space to solve problems as they arise. Plus, if everything goes smoothly, you’ll feel that much better about it!

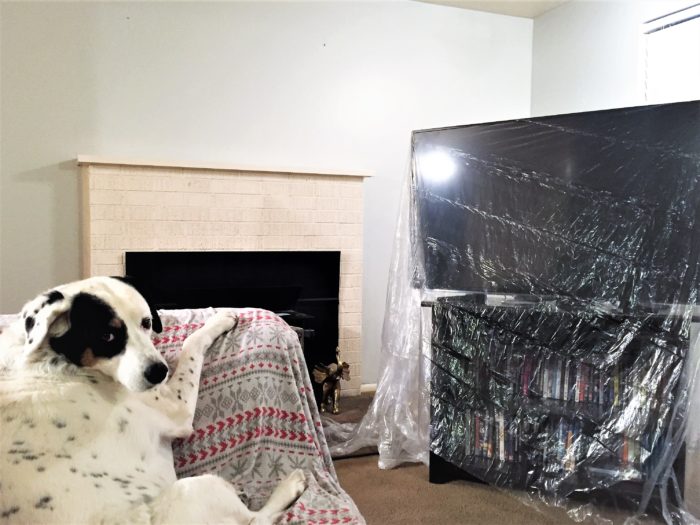
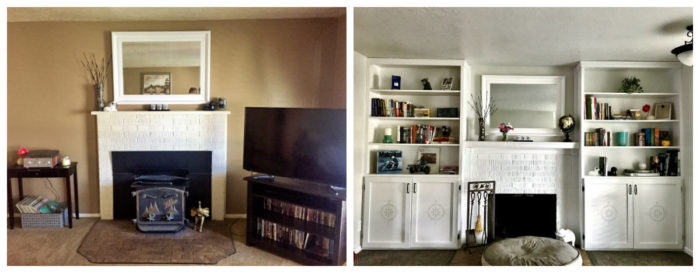
Dad cuts brick off the fireplace because the shelves he built were too wide
Everything Takes SO MUCH LONGER Than Originally Expected
I’ve always wanted a home with built-in bookshelves around the fireplace. I asked my dad if he could tackle such a project, and he told me it would be no problem at all. I figured we could have it done over Memorial Day weekend with time to spare.
It took a month and a half.
The shelves were just the tip of the iceberg. Every single project we shouldered took two to 10 times longer than predicted. Why? Because every project came with multiple obstacles we hadn’t expected. Special tools or supplies needed to be purchased, extra help needed to be called in, wood was measured five times and still cut incorrectly — almost everything that could go wrong, did. We spent so much time at Lowe’s that the people in the store eventually knew us by name. Weekends lost their lustre because I knew I’d spend the entirety of them working on the house. It was rough.
What you can learn from my mistake: Don’t count on things happening over night. Take on one project at a time and plan for it to be a long undertaking. Above all else, be patient.

Covered in paint with a jacked up ankle
It Hurts
Oh. My. God. I discovered muscles I didn’t know I had. Home renovation requires stretching, pushing, lifting, bending, twisting, squatting, and so much repetitive movement. Some projects require contortions worthy of circus performers. In fact, I think I may have permanently injured a tendon in my left hand just from painting the ceiling in three rooms. And that’s just when things are going well! There’s also all the things dropped on toes, fingers smashed, scrapes, bruises, and lacerations. It’s a bit dangerous, to be honest.
What you can learn from my mistake: Stretch beforehand? I honestly don’t know, I think some form of injury is just a given. Take lots of ibuprofen and have some bandages and rubbing alcohol on hand.
It’s an Amazing Learning Experience
Despite all the trouble and pain, I wouldn’t take any of it back. First and foremost, I love the results achieved. But it was also a remarkable learning experience. I learned about outlet wiring, how to properly adhere moulding to brick, how to finish the edges of particle board, how to find a freaking doorbell terminal, and much, much more. Ultimately, there’s something so incredibly satisfying about looking at a room you love and knowing that your hard work is what made it so beautiful.
Tada!
If you’re on the cusp of starting your own DIY home renovation, my advice to you is this: Swatch your paint well, expect multiple obstacles, recognize that it will take a lot of time, be ready for a little physical pain, and know that it will all be worth it in the end. Happy renovating, friends!
Also by Liz: 5 Tips To Taking The Road Trip Of Your Dreams (& Riding Off Into The Sunset)
How I Stopped Passing Judgment On Others & Gained A Self-Esteem Boost
Get more like this—Subscribe to our daily inspirational newsletter for exclusive content!
__
Photo: Photo by Patrick Perkins on Unsplash; Liz Greene