Do you love Mason Jars? DIY pantry staples might be your calling!
Raise your hand if you put yourself in charge of the group projects in school because you couldn’t trust other people to do it “right”? Me, too—and I welcome you to the DIY Club. Yes, I was that annoying kid in school (sorry, guys), and I’m still that person when it comes to relinquishing control over an important outcome, like what I eat. It’s in my nature to DIY pretty much everything, including 75 percent of my meals and beverages. But with certain pantry staples, it’s not always obvious even to people like me that there’s a way around relying on the Middle Man to provide. Inexpensive, conveniently packaged, and often used ingredients somehow get overlooked if they’re foundational—it’s hard to imagine breaking down something like spices or condiments into even simpler component parts that you could combine yourself. But where there’s an innovative will there’s a way, and in the same way that group project was always better when I took the reins, I’ve found that many of the things I once thought required a run to Trader Joe’s or Whole Foods now just require a browse through the cabinets and a whiz of a blender.
My top five DIY staples started off as experiments and quickly evolved into recipes I genuinely enjoy making. Watching the transformation of foods from one form into another like this not only makes me appreciate a simpler way of eating and cooking, but just how awesome plant-based foods really are! I hope you find them as tasty and time-saving as I do.
- Nut Butter: This seems like a DIY-no-brainer given its cult Instagram status, but to a novice, the process can be a bit confusing and frustrating. Depending on your appliance (I have a food processor), the grinding of hard, crunchy nuts into creamy, silky butter can be more or less successful, but there’s a simple trick to getting it right every time. You must roast or soak/sprout your nuts beforehand; otherwise, you’ll get a chalky chunk of non-spreadable, barely-edible paste. While I was once a raw-nut devotee (for whole nuts and butters), I realized that the roasting process significantly softens even tough varieties like almonds, and imparts a richer flavor to all. Buy them raw (points for buying in the bulk bin, with reusable bags!), then roast them yourself to avoid extra oils, salt, and additives: just toss them (naked) on a baking sheet, roast at 300 degrees for 20-30 minutes until fragrant and golden, then blend. The blending process also requires patience, so don’t stop when you think the tough ball of nut-paste is good enough. It’s not. You deserve better. Once the butter is truly, consistently creamy, with a bit of oily film on top, add a touch of cinnamon, sea salt, or maple syrup for flavor (another perk of DIY-ing is that you control the flavor and add-ins!). Mason-jar it up, and you’ll be spoon-licking happy in no time.

- Non-dairy milk: Like the nut butters, the apparent ease of DIY milk isn’t quite true when you first attempt it. Having the right tools are essential, especially in the “milking” stage. The first step of soaking your nuts (almond/cashew) or grains (oats/rice) overnight is easy as vegan-pie, as is the blending bit (as long as you’re mindful of the pulp-water ratio; too much water in your blender may cause spillage). Once you have you’re almost-liquid, you need to get rid of that pulp, and that’s where your nut bag comes in handy (I tried with an old stocking, and I wouldn’t suggest it). This large, finely meshed sack helps you filter out all the pulp and squeeze out all the potential liquid without creating a puddle-y mess on your counter. What to do with the pulp, you ask? In the spirit of simplicity, skip the cracker and cheese concoctions and just spread it evenly on a baking tray, roast at 300 degrees until golden brown, and enjoy a crunchy topping perfect for breakfast, salads, soups…
- Vegetable stock: I’m always surprised when I see non-vegetable things in the ingredients of store-bought stock. Alleviate yourself of one more why question with DIY stock! Instead of composting all your veggie scraps (which I know you do…ahem) save the stems of savories like carrots, celery (including celery root), beets, herbs, and even onion and garlic skins in a large freezer bag (or old produce bag). Once you have a full bag, throw the scraps in a pot with 8 cups of water (depending on how much stock you want). You can add some fresh herbs if you like to boost the flavor, but I don’t find it necessary. Once the liquid boils, reduce to a simmer and cook for about 45 minutes. You can add some salt if you like, or add in with each subsequent recipe for more sodium control. You’ll have to strain out the scraps and eventually toss them, but I love how this method gives the produce two chances at life. Remember that your stock will taste like what you put in it, so don’t overload on any one thing if you want a neutral base. Freeze the stock in 2-4 cup batches, so you can use them easily for soups.
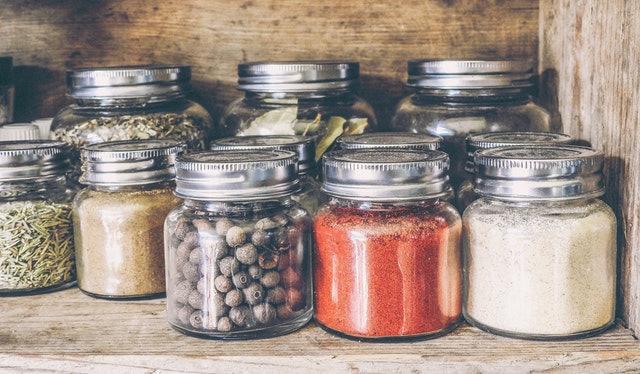
- Spice blends: When you find your groove as a home cook, you’ll likely be making a lot of the same recipes/flavor combinations over and over again. For a long time I felt guilty about my lack of variety, but then I realized how genius it is to remove the decision-making process from this key part of my day—one that’s supposed to be nourishing and relaxing in the first place. (Talia of Party in My Plants agrees.) Spicing your cooking well is one way to add reliable flavor, but an even simpler way is preparing your favorite blends of spices in one jar so you don’t have to open five or six every time you come to the stove. The magic Ayurveda blend for digestion combines equal parts fennel seed, ginger, tumeric, coriander, cumin, and 1/4-part cayenne pepper (more if you like a kick!), but I also love this spicier Shawarma Blend. Doing this ahead of time allows you to make better use of bulk spices and ensure an even flavor combo with each shake.
- Dressings and Sauces: Like stock, it’s often surprising what all food companies decide should go on top of your salad that isn’t exactly edible. Clean up your efforts at clean eating with simple sauces that combine a fat, acid, and spice for very versatile toppings. Tahini is a go-to for me because it picks up on savory and sweet flavors, but good old-fashioned olive oil or sesame oil are great fat bases for sauces. Balsamic and apple cider vinegars usually can also go either way flavor-wise, as does lemon and lime juice, though a drier rice, red- or white-wine vinegar is also a good option. For an umami punch, miso can come in handy, too. The consistency is up to you, too—more watery if you’re tossing it on greens for a salad, thicker for a roasted bowl.

Balsamic Glazed Tofu with Bok Choy & Miso Dressing

What pantry staple is coming off your weekly shopping list? Share your tips and tricks!
Also by Jennifer: Creamy Vegan Vegetable Curry
Related: Still Don’t Like Lentils? How To Cook Lentils The *Right* Way–Plus 5 Recipes
No More Sad Desk Lunch: 5 Nutritious Ways To Break Out Of A Food Rut
Get more like this–sign up for our newsletter for exclusive inspirational content!
__
Photos: Pexels.com; Jennifer Kurdyla; Mary Hood Luttrell, Brooke Lark on Unsplash